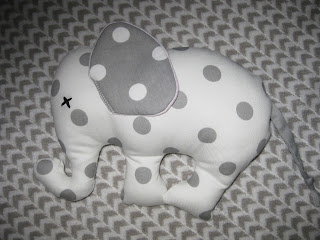
Unfortunately I do not have photos of everything I made but here is the quilt and a little stuffed elephant from scraps.
Isn't that elephant cute? I have the tutorial for that.
Start by downloading this pdf pattern.
You will need:
1/3 yard of fabric for body
coordinating scrap fabric for contrasting ear
embroidery floss for eye
6 inches of cording for tail or use contrasting fabric
poly-fil
scrap of quilt batting
Step 1
Print the pattern and tape the body to the head matching solid line.
Step 2
Fold 1/3 yard of fabric in half. Place pattern pieces on fabric and cut.
Cut contrasting ear on folded piece of scrap fabric and on quilt batting.
Step 3
Stack ear pieces in the following order; contrasting ear right side up, ear with main fabric right side down, batting.
Step 4
Sew 1/4 inch around ear leaving side of ear open for turning. Hint: sew with batting on top.
Clip curves, turn right side out. Fold open edge to inside, press.
Step 5
Attach ear to head using the dotted line for placement. I used a blanket stitch on my machine but any stitch will do. For a more whimsical look have the contrasting fabric side facing out.
Step 6
Using embroidery floss and hand needle, stitch an X on both sides of head referring to pattern for placement.
Step 7
Pin the ear down to keep it away from getting caught in the seam. Pin tail to elephant referring to pattern for placement.
Step 8
Pin pattern pieces right sides together. Stitch leaving opening for turning and stuffing. Clip curves of seam allowance, turn right side out and press.
Step 9
Begin stuffing elephant by starting with the trunk and legs. Continue stuffing but do not overstuff. Sew opening closed by hand with a slip stitch.
Show me your creation. I'd love to see what fabric choices you make and other additions to the pattern.


