Friday, April 29, 2016

Tooth Fairy Pillow

Welcome back to Cloudy Creations.  I have been idle on the blog for too long.

Recently my daughter asked if I could make a pillow for when my granddaughters begin to lose teeth and want to leave it for the Tooth Fairy.  Well of course this grandma got right on it.  What do you think?


There's a pocket on the back for the tooth and money!


The pattern and directions are a pdf, so just open and print.


Let me know if you have any questions.

By the way, by the time I posted this my granddaughter lost her first tooth!


Upholstering an Armchair

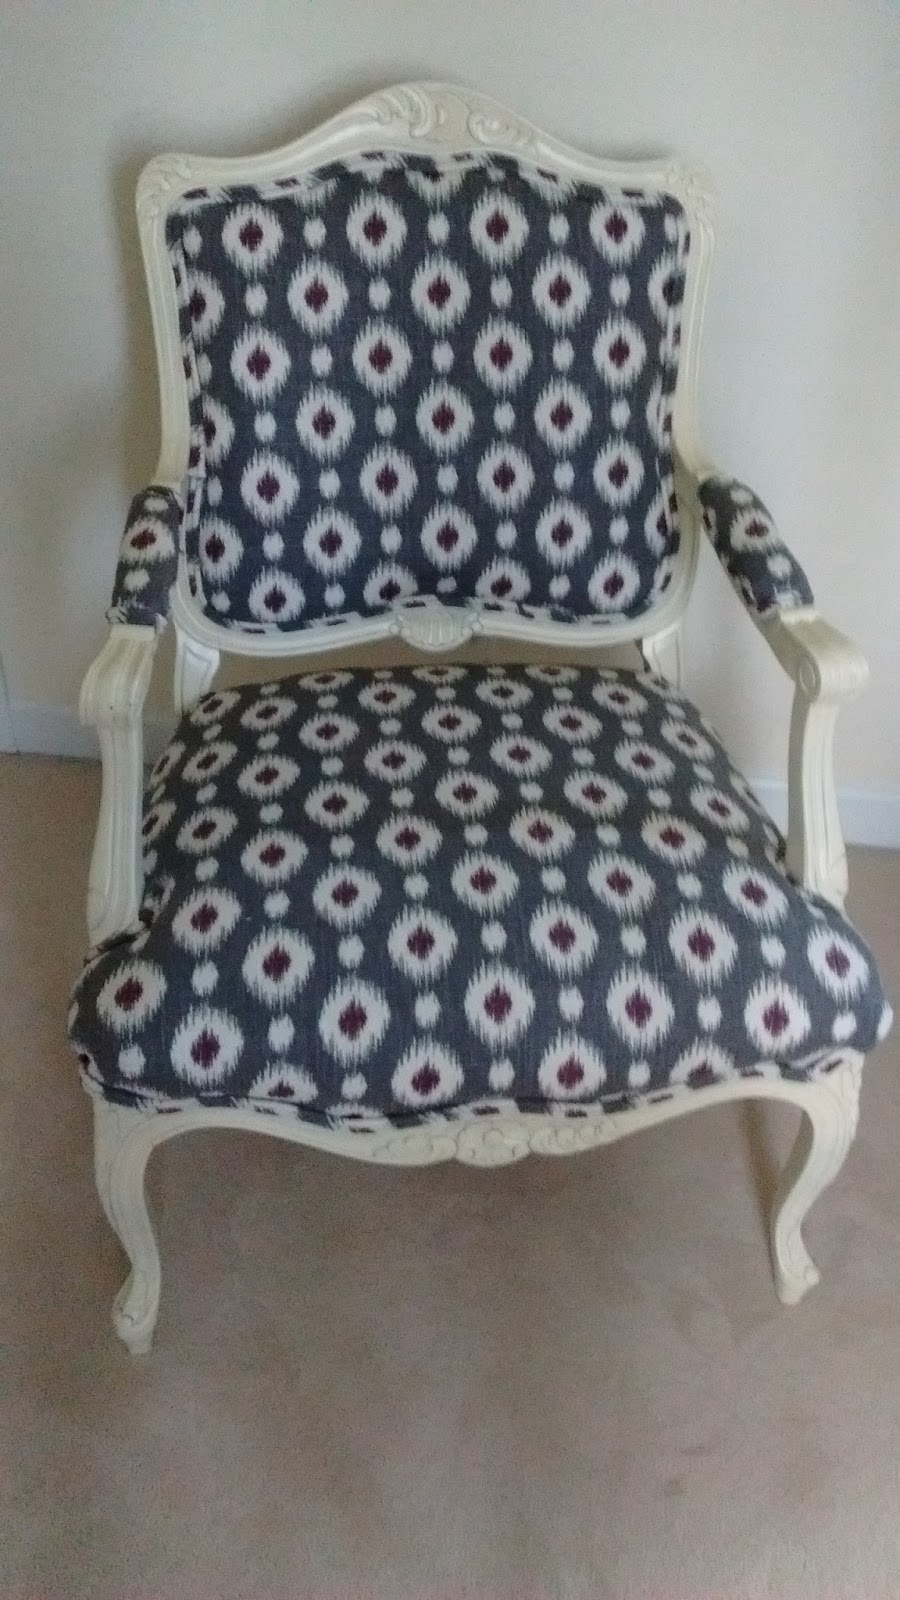
I was given this chair from my wonderful friend Patti.  She thought I could use it in my bedroom.  Well with a little love I could and I did.

This is the condition the chair was in when I received it...


It's has good bones but it needed a bit of love to make it look like this...


Now the "whats" and "how to's!"

Supply List
Flat head screwdriver
Needle nose pliers
Cleaner (I use TSP Cleaner for my painting projects) 
Paint
Fabric and trim (I made mine using the fabric and purchased cording)
Staple Gun
Hot Glue Gun and glue sticks
Scissors


Step 1
Removing old fabric

First I carefully removed all tacks and staples.  I say "carefully" because you will reuse the fabric as your pattern.  

To remove the staples it is easiest using a small flathead screwdriver and needle nose pliers.  Get the screwdriver under the staple enough to lift it and pull it out with the pliers.

There must have been over 400 staples to remove, someone was trigger happy at the furniture factory. 


Step 2
Prepare surface for painting

After the fabric is removed, clean the wood and prep for painting.  I used TSP Cleaner for this project.

Step 3
Prepare your painting area

I wanted to use spray paint and work in my garage but did not want to get paint misting all over the floor and walls.  What I came up with was making a painting booth by hanging drop cloths (I save old sheets to use as drop cloths) from my garage door railings and the inside of the garage door with clothes pins.  Maybe you can get an idea of what I mean from the below photo.


You will also want to cover the foam or batting that cannot be removed.  I used an old towel pinned to the cushion.

Step 4
Painting 

Paint your chair whatever method you like best and feel comfortable doing.  I used Krylon in Ivory satin purchased at my local Ace Hardware.  This paint dries to the touch in 10 minutes.  I put multiple coats on in a short time and was able to obtain complete coverage with two cans.  Allow to dry overnight before upholstering.


Step 5
Cutting your fabric

Cut out your new upholstery fabric using the old fabric as your pattern pieces.  If you have a designed fabric (stripe, floral, etc.) be sure to center your pattern pieces on the design so the design lines up on your seat and back.  See the image below from French Garden House.


You will want to line up the stripe in the fabric so that it is centered on the back of the chair and the seat of the chair.  If you fold your pattern piece in half down the center, you can place that fold on the center stripe. 

Cut out your pattern pieces giving yourself 1-2 inches extra around the pattern as you cut.


Step 6

Stapling your fabric to the chair

This is where the fun begins because you can see how great your chair is going to look.   

If you removed any batting or foam be sure to put it back in place before upholstering.  I was lucky and could reuse my batting.  If yours is mildewy or ruined you can purchase new batting at your local fabric store.

Using staples large enough to go through all layers of fabric but not too large for the job (I used 5/8 inch staples) begin by stapling the seat cushion in the center front, then the center back by pulling the fabric tight before stapling.  Be sure to pull the material tight to avoid any wrinkles but not so tight that the fabric gets off centered.  Do the same on each side remember to pull as you staple.  Continue working around the chair pulling and stapling and alternating the front and back and side to side.  Using scissors (or a razor blade) remove excess fabric.  

Continue in the same manner for the back of the chair and the arms.

Step 7

Attaching Trim

In this last step you will use a hot glue gun to attach a decorative trim around the edge to cover up the staples.   

Once your glue gun is hot and ready, begin in the back of the chair or a hidden spot near a leg.  Place a moderate line of glue over the staples and quickly place the trim on the glue.  Work in 3-4 inch sections at a time.  When you come back around to where you started, cut your trim about 1 inch longer than needed.  Tuck under 1/2 inch and glue down over your starting point.

You can use a purchased trim such as braiding or welting. I made my own welting to match my chair by using the techniques from blogger Vidya at What's Ur Home.

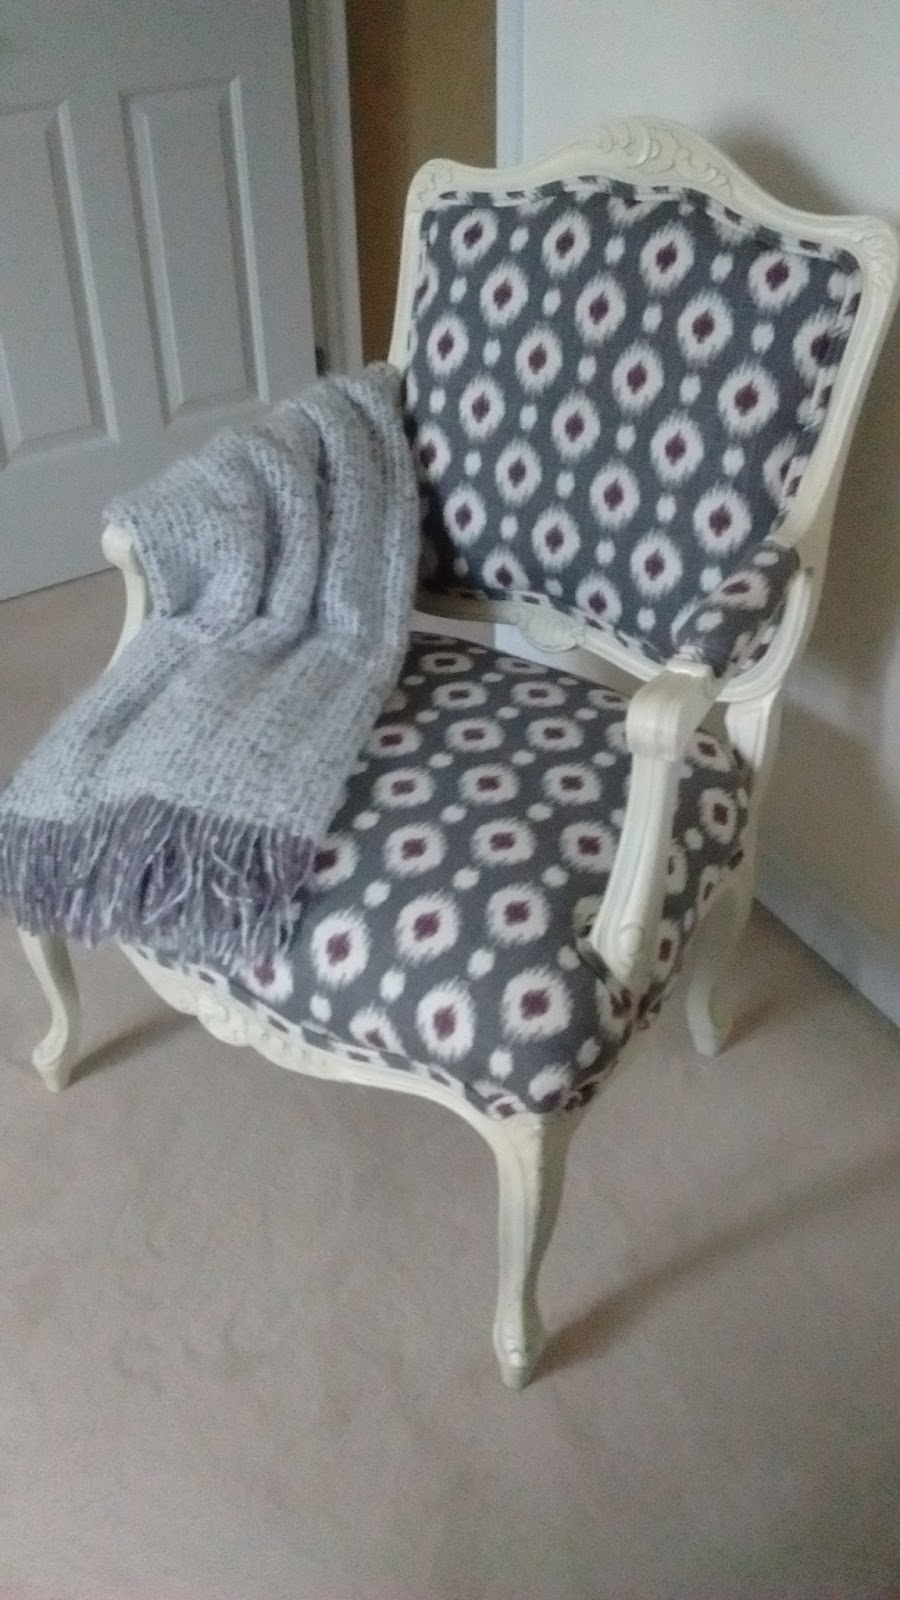
Now sit back and enjoy your newly upholstered chair.


Thursday, March 13, 2014

Finally got it done!

I finally finished painting the dresser in our bedroom to match the bedside table I painted in November.  I didn't quite procrastinate, first there were the holidays to get through, then hand surgery and recovery, next a planned vacation away from the snow and now it is completed.  What do you think?


I quite like it.  Next I will work on sewing a bedspread/duvet, pillows and a window treatment.  But first a trip to Denver to see those grandbabies.

Wednesday, December 18, 2013

Just Add Snow... Snowman Kits to DIY


I have seen these kits in catalogs and knew I could make it myself.  In fact I decided this would be a great project to make for the grand kids and great nieces/nephews this Christmas.  Here's a step by step of how I DIM (did it myself).
Supply List:
Wooden closet rod or large dowel about 12 inches in length
Wooden drawer pulls, 3 round (buttons) and 2 square (eyes)
1/4 " dowel
Wood glue
Drill with 1/4" bit
Saws; miter and band
Assorted paint; black for eyes and mouth, orange for carrot nose, red & green for buttons
Spray shellac if not using outdoor paint
Time

Optional Supplies:
Scarf 
Hat
Bag to hold kit

Step 1
With a miter saw cut the closet rod into five 1/2 inch pieces for the mouth.  Use the remaining length of closet rod to shape a carrot nose with the band saw (or whittle it).  
Step 2
Cut eleven 3 inch lengths from the 1/4 inch dowel.
Step 3
Using a quarter inch drill bit, drill holes into the back of each mouth, nose, eye and button pieces.  Drill about 3/8 inch down but not through the wood.   Glue dowel cuts with wood glue to each piece. 

Step 4
Paint the pieces and let dry.
Step 5
Add button holes with your black paint.  Let dry.  I tried using white paint to make the buttons look like they had thread but did not like this look so I painted over them.


Step 6
After the pieces are all dry, coat them with shellac for durability in the wet snow.


If you want to go a step further, make a drawstring bag to place all the pieces in.  I used white fabric to make the bag and ironed on a design using this cute label I made.  I printed it on iron-on transfer paper that I purchase at JoAnn's.


I hope the kids have many years of fun snowman building.

Saturday, December 14, 2013

Rice is Not Just for Eating! Bed Buddy Tutorial


Baby it's cold outside!  With all the snow and bad roads it's been easy to tackle projects that have been on my plate.  This one is just the ticket for a last minute gift or something to keep you and your family toasty warm,  rice heating bags or as I like to call them, Bed Buddies.  So simple to make and just a few ingredients;  fabric, thread, sewing machine and rice.

1.  Start with a medium weight fabric cut in a 15" x 27 " rectangle.  (You could also use a hand towel.)


2.  Fold the fabric in half wrong side out.


3.  Sew the right and left sides closed with a quarter inch seam allowance.  Stitch again for extra strength.  Turn right side out and press.  Press under 1/2 inch on open edge.


4.  Mark off from the fold to the open edge five row.  Each should be close to equal in width, approximately 2 7/8 inches wide if you started with a 15 inch wide piece of fabric minus the two 1/4 inch seams.  To find the exact measurement you can measure between your sewn edges, multiply by 5 and you get your row width.  Place pins at the top of each row.  You can draw a line with chalk, pin or eyeball your sewing line.


5.  Starting at the top using a straight stitch, sew from top to bottom to make your 5 rows, be sure to backstitch at the beginning and end to secure threads.  Hard to see in this photo because my thread blends in with the fabric pattern.


6.  Now the fun part.  Pour rice into each row about 2/3 full, approximately 1 1/4 cups of rice.  I do this over a pan and had my husband hold open the bag while I carefully poured.  I tried using a funnel, but the one I had, had too narrow of a neck opening for the rice to go down smoothly.


7.  Pin and sew the top opening closed.  I like to use a zig zag stitch and a straight stitch so that no rice can escape.


Almost finished but one more step... the heating instructions.

8.  Download the attached tags and print off if making a gift.  Bed Buddy Label

I like to print on cardstock and pin with a ribbon before wrapping up to gift.  If you don't want to use the tags the instructions are to microwave for 2 1/2 minutes and increase in increments of 30 seconds if you need it hotter.  Can also be frozen and used as an ice bag.  Do not wash as this will cause the rice to become moist and spoil.


My favorite use for this bag is to warm up at bedtime, place between the sheets at the foot of the bed for a toasty warm sleep. 

Enjoy and let me know how your project turned out.


Tuesday, November 26, 2013

Nursery Sewing

With an upcoming baby shower around the corner I offered to sew the nursery items... crib skirt, bumper pads, quilt and valance.  It was rewarding and I was given free reign to be creative.  Because I wanted to do this project I enjoyed it.  Some projects I wonder "what the @#&% was I thinking" but this was not one of them.

Unfortunately I do not have photos of everything I made but here is the quilt and a little stuffed elephant from scraps.


Isn't that elephant cute?   I have the tutorial for that.

Start by downloading this pdf pattern.

You will need:
1/3 yard of fabric for body 
coordinating scrap fabric for contrasting ear
embroidery floss for eye
6 inches of cording for tail or use contrasting fabric
poly-fil 
scrap of quilt batting

Step 1
Print the pattern and tape the body to the head matching solid line.  

Step 2
Fold 1/3 yard of fabric in half.   Place pattern pieces on fabric and cut.
Cut contrasting ear on folded piece of scrap fabric and on quilt batting.

Step 3
Stack ear pieces in the following order; contrasting ear right side up, ear with main fabric right side down, batting.

Step 4
Sew 1/4 inch around ear leaving side of ear open for turning.  Hint: sew with batting on top.
Clip curves, turn right side out.  Fold open edge to inside, press.

Step 5
Attach ear to head using the dotted line for placement.  I used a blanket stitch on my machine but any stitch will do.  For a more whimsical look have the contrasting fabric side facing out.


Step 6
Using embroidery floss and hand needle, stitch an X on both sides of head referring to pattern for placement.

Step 7
Pin the ear down to keep it away from getting caught in the seam.  Pin tail to elephant referring to pattern for placement.  


Step 8
Pin pattern pieces right sides together.  Stitch leaving opening for turning and stuffing.  Clip curves of seam allowance, turn right side out and press.

Step 9
Begin stuffing elephant by starting with the trunk and legs.  Continue stuffing but do not overstuff.   Sew opening closed by hand with a slip stitch.


Show me your creation.  I'd love to see what fabric choices you make and other additions to the pattern.


Wednesday, November 20, 2013

Bedside Table Transformation

I recently took a class with Shizzle Design on using CeCe Caldwell paints.  I was inspired to change my bedroom look after some recent painting in the bathroom.   We had all the oak trim on our main floor painted white and the wallpaper stripped from the bathroom.  The bathroom was then painted with a deep berry color.   Now what color to use for towels and shower curtain... Gray was my choice and I love it.  What do you think?


Now back to updating the bedroom... I have had the same bedspread for over 11 years.   You must agree that it is time for a change.  Since the bathroom is attached to the bedroom I want to keep the color scheme flowing.  Here is my old bedside table.  The dresser matches, natural pine top with a wash of green over the rest of the piece.


Step 1
Wash the furniture with TSP, a simple inexpensive powder cleaner that is added to water.  This important step will help the paint adhere.  You can find it in the paint section of your hardware store near the paint stripper.


Step 2
I painted the piece with CeCe Caldwell's Seattle Mist, being careful to have the areas that I would later want exposed covered well with paint.  You can see the first coat drying in this photo.


Step 3
After the paint was dry (you can use a blow dryer to speed up the process) I proceeded with the second coat using CeCe Caldwell's Pittsburgh Gray.  Now let that coat dry.  I waited over 24 hours but that was not my original intention.   During the class we got word that there were tornado/storm warnings and I decided to head home.   I did not get back to my table for about a day and a half.


Step 4
Now the fun begins.  Using a wet, not damp and not dripping, rag, begin to gently rub the areas you want distressed revealing the first layer.   Don't rub too hard or you will get back to the original finish.  You can keep rinsing and re-wetting your rag as needed.  After rubbing all the edges and corners, I scrunched up my wet rag and gently rubbed the flat areas to create some dimension.   I went both with and against the grain.  Again let it dry.

Step 5
Tear a piece of paper grocery bag and use it to rub against all surfaces.   This helps make it smooth to the touch.

Step 6
Using CeCe Caldwell's clear wax and a waxing brush apply the wax.   For the entire bedside table I probably used 2 tablespoons of wax.  Work the wax into all areas going every direction with your brush.  Here is a tutorial link on applying the wax from Shizzle Design. 

Step 7
You can let the wax set a while or go right at it with a buffing brush or rag.  I used a wax brushing brush that attaches to your drill.  Easy to use and the time savings is worth it.  Another tutorial link from Shizzle Design.

Here is my finished product.


Now the fun begins... I need to paint the dresser, pick out fabric to sew window treatments, a window seat cover, pillows and possibly a new bedspread or duvet!   I will post my progress as I redecorate.  Wish me luck.